Chapter 2 Creating a data package
In the previous chapter, we submmitted a data package through the web form. In this chapter, we will teach you how to create and submit a data package to a DataONE member node (MN) via R. But first, please read this paper on the value of structured metadata, namely the Ecological Metadata Language (EML).
2.1 What is in a package?
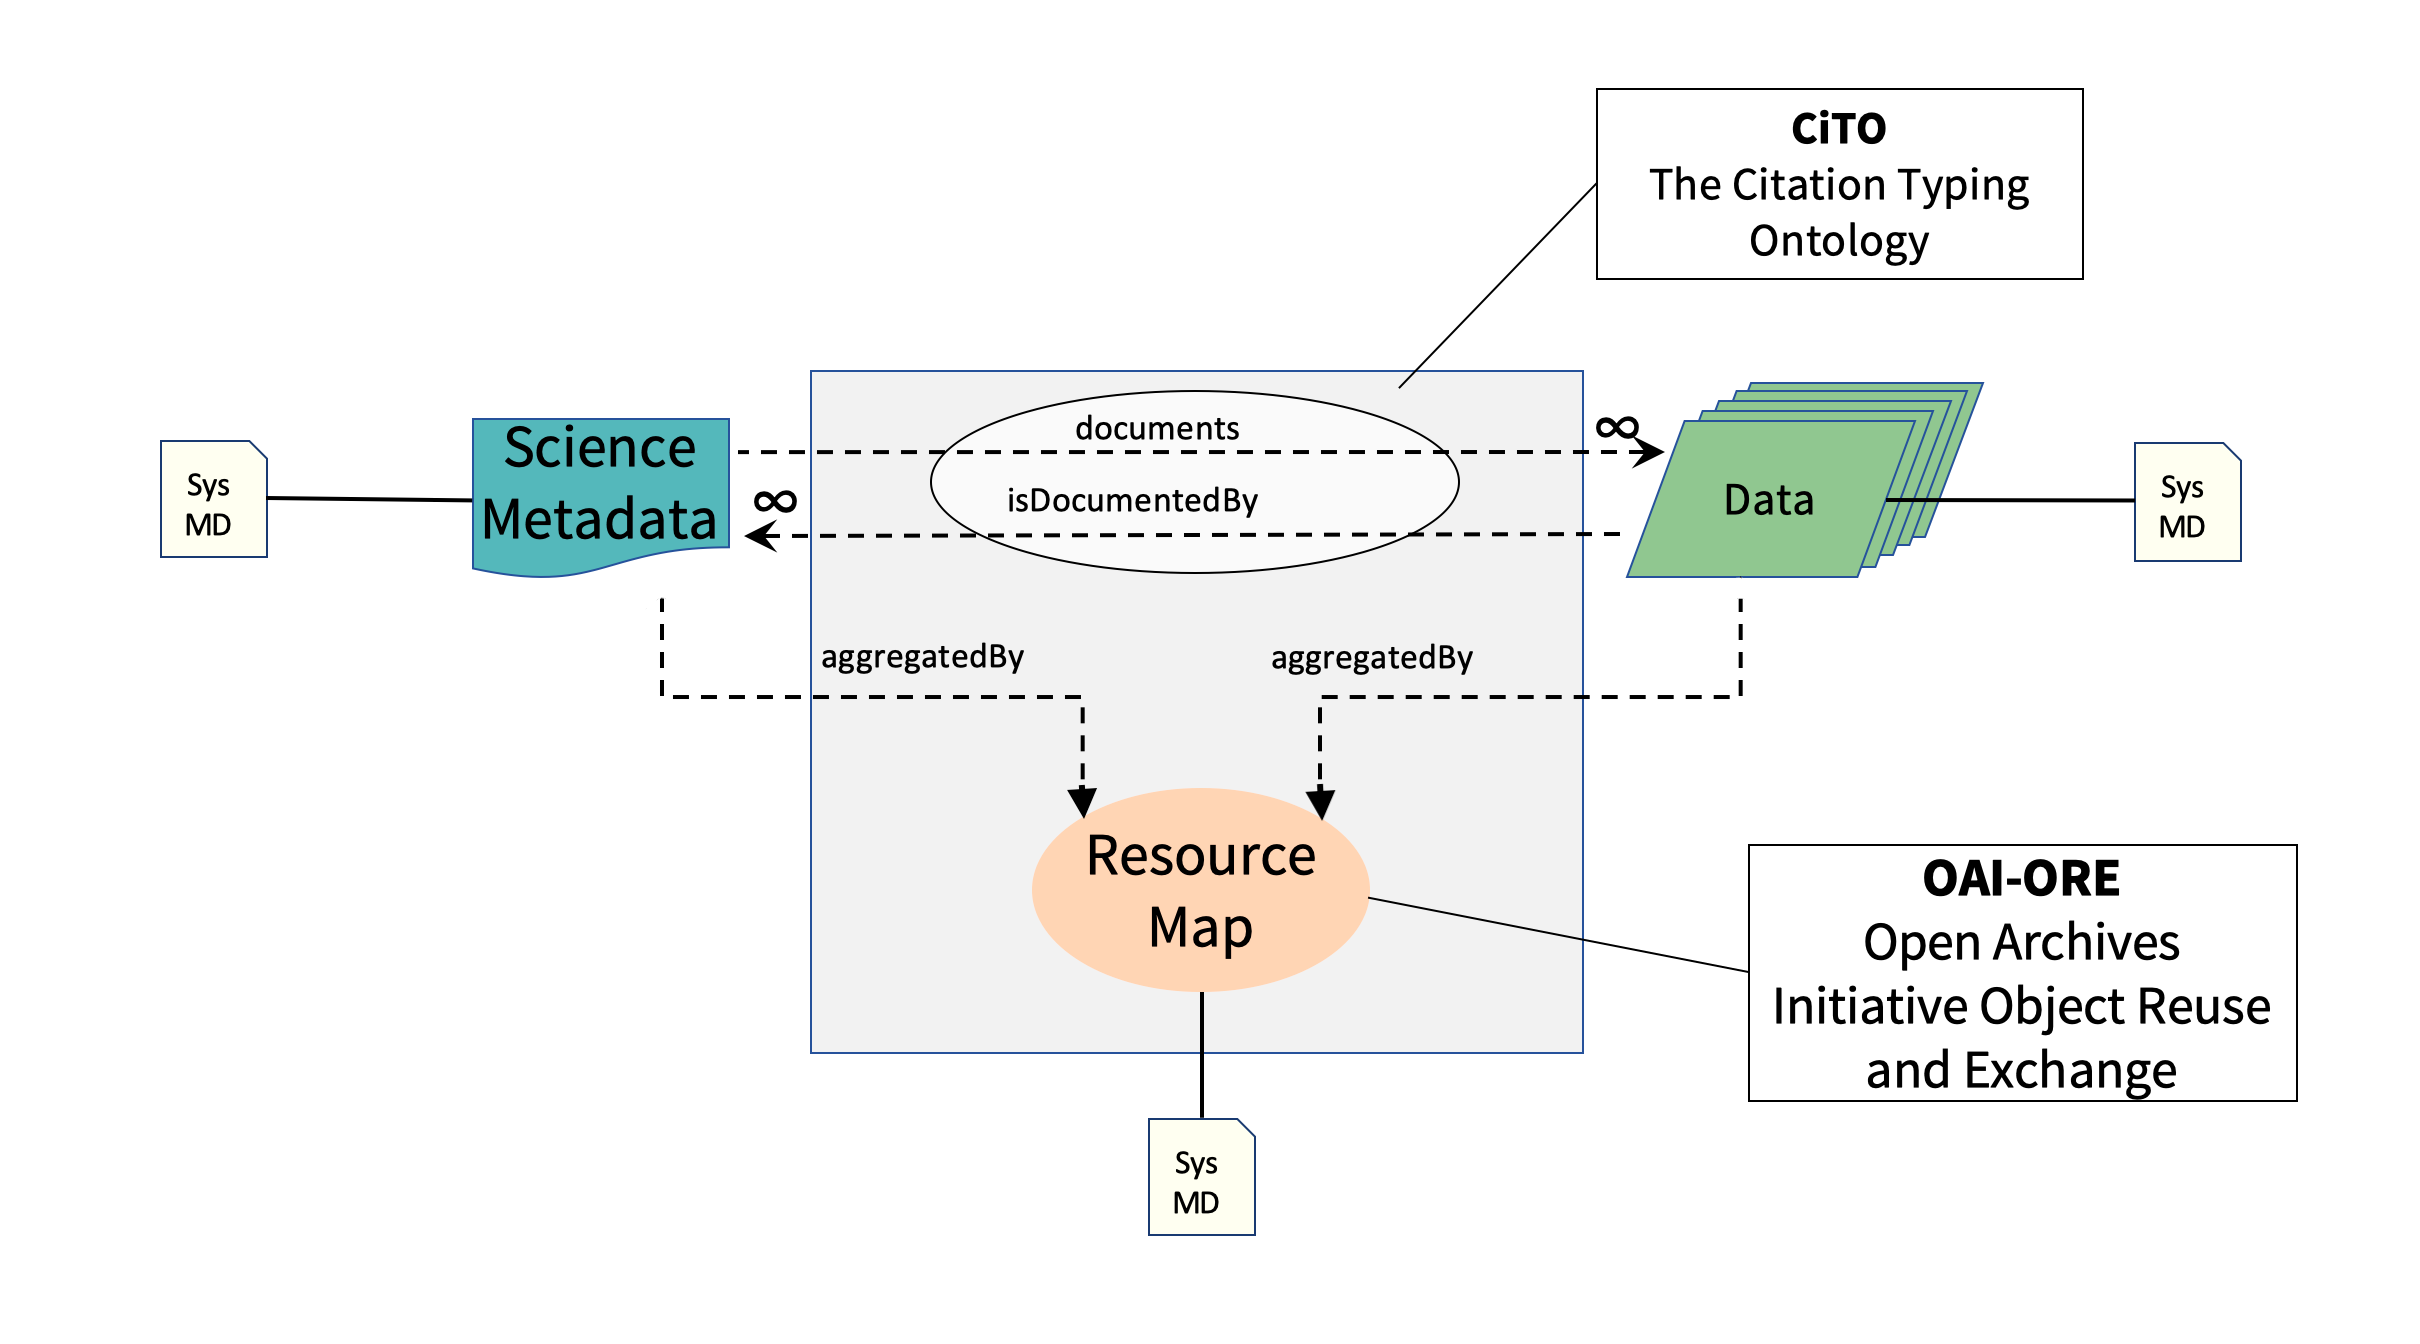
A data package generally consists of at least 3 components.
Metadata: One object is the metadata file itself. In case you are unfamiliar with metadata, metadata is information that describes data (e.g. who made the data, how was the data made, etc.). The metadata file will be in an XML format, and have the extension
.xml(extensible markup language). We often refer to this file as the EML (Ecological Metadata Language), which is the metadata standard that it uses. Each dataset page in the Arctic Data Center is a direct representation of an EML document, made to look prettier for the web.Data: Other objects in a package are the data files themselves. Most commonly these are data tables (
.csv), but they can also be audio files, NetCDF files, plain text files, PDF documents, image files, etc.Resource Map: The final object is the resource map. This object is a plain text file with the extension
.rdf(Resource Description Framework) that defines the relationships between all of the other objects in the data package. You can think of it like a “basket” that holds the metadata file and all data files together. It says things like “this metadata file describes this data file,” and it is critical to making a data package render correctly on the website. Fortunately, we rarely, if ever, have to actually look at the contents of resource maps; they are generated for us using tools in R.
2.2 Packages on the Website
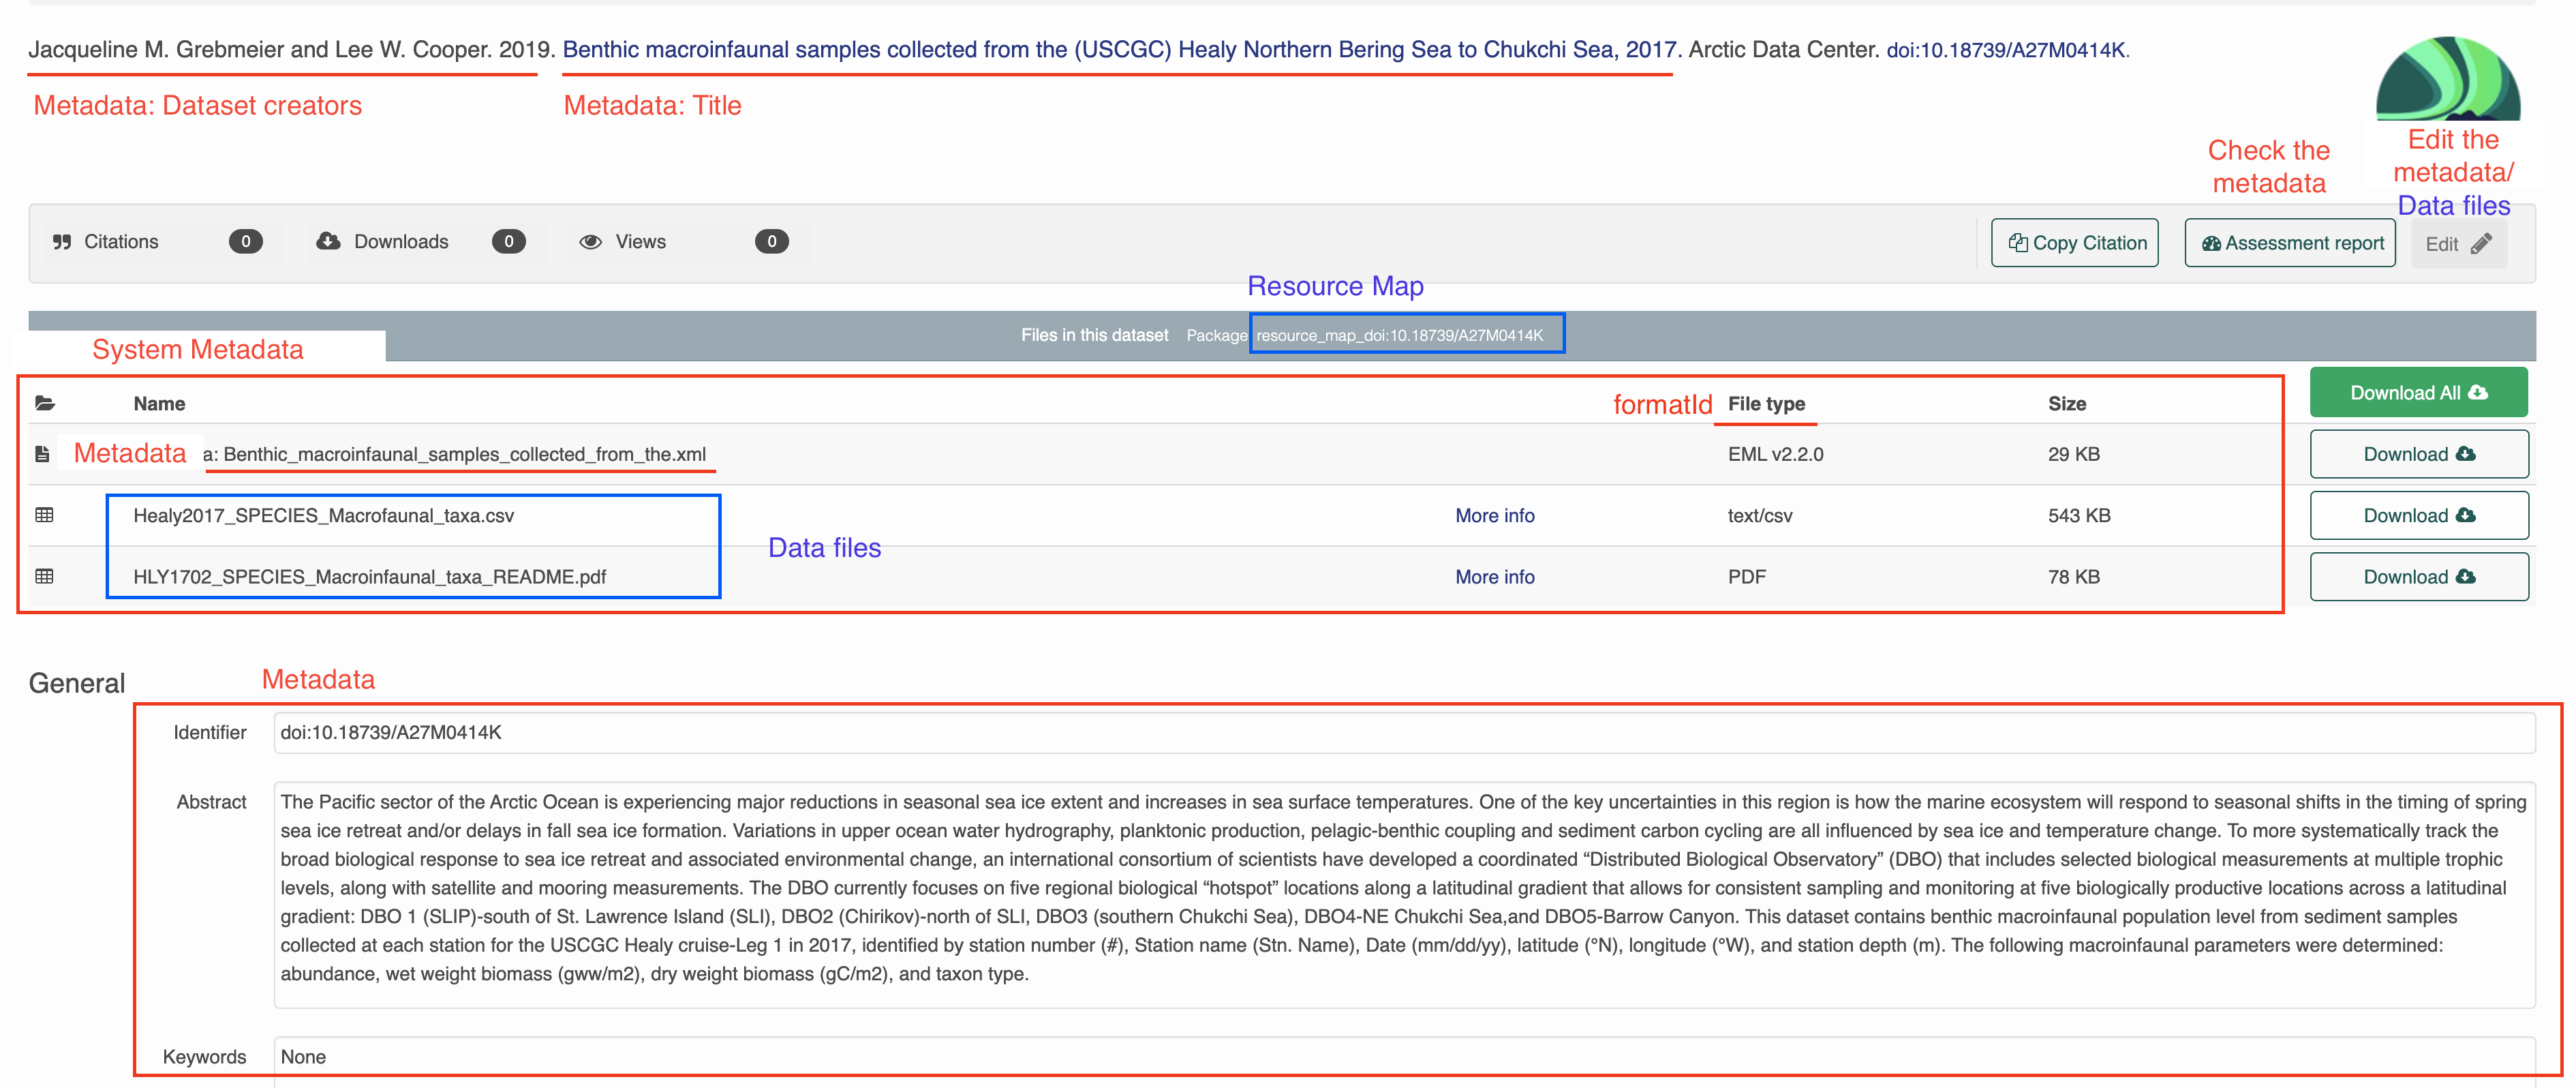
All of the package information is represented when you go to the landing page for a dataset. In the previous section, you uploaded a data file and made edits to the metadata using the web editor. When you make changes to the metadata and data files through R, those published changes will also be reflected here.
2.3 About identifiers
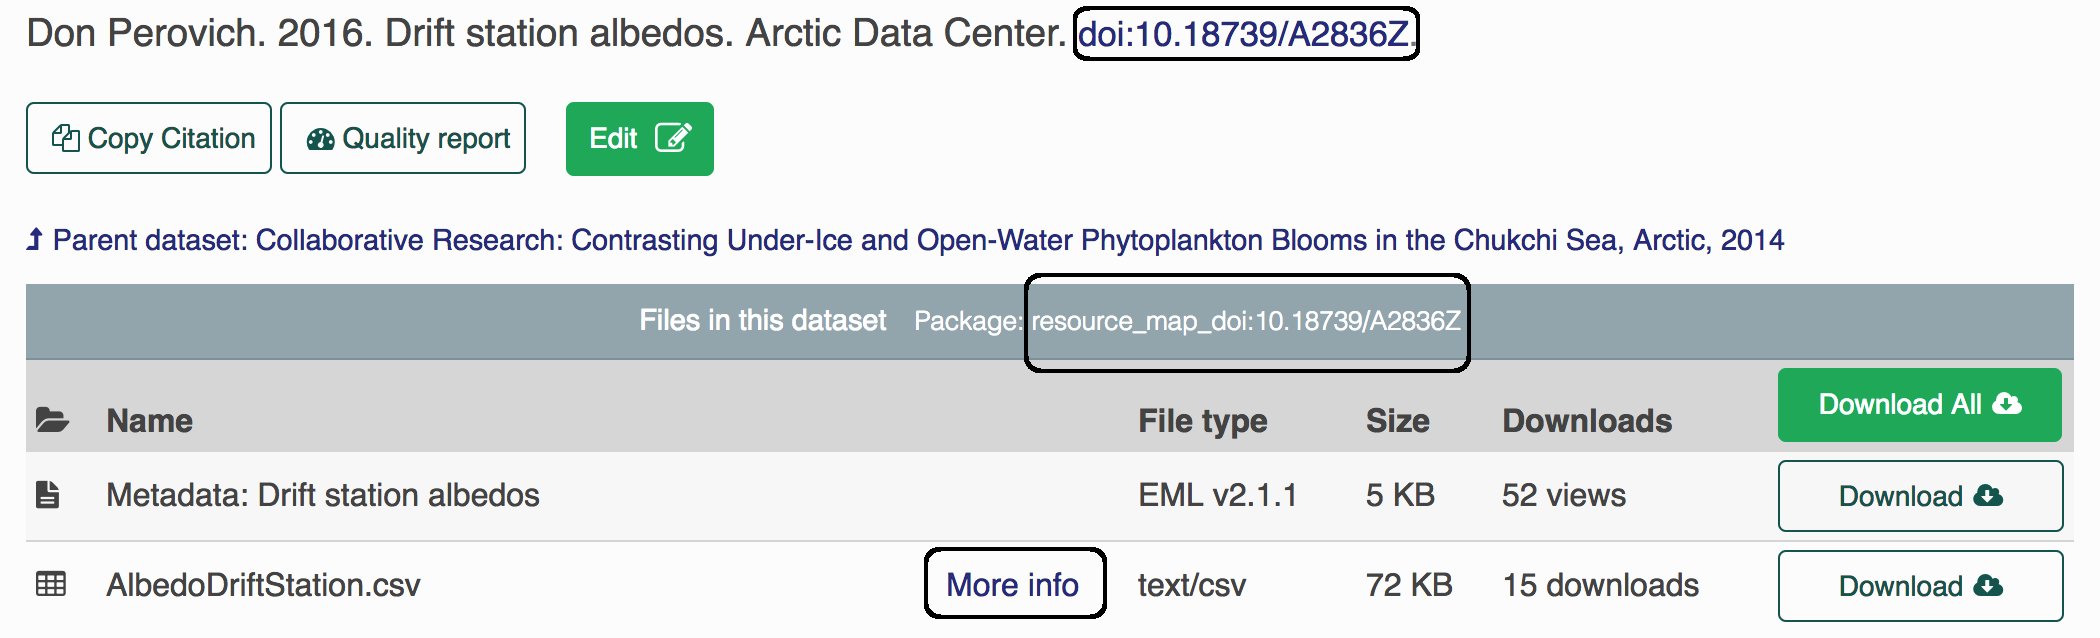
Each object (metadata files, data files, resource maps) on the ADC or the KNB (another repository) has a unique identifier, also sometimes called a “PID” (persistent identifier). When you look at the landing page for a dataset (for example here), you can find the resource map identifier listed under the title in the gray bar after the words “Files in this dataset Package:” (resource_map_doi:10.18739/A2836Z). The metadata identifier is in the “General > Identifier” section of the metadata record or after the title with blue font (doi:10.18739/A2836Z). And the identifiers for the individual data objects can be found by clicking the “more info” button next to the data object, then looking at the “Online Distribution Info” section.
Note, all datasets submitted are given a preliminary identifier (usually starting with urn:uuid:). When the dataset is finalized, a DOI (digital object identifier) will be issued. DOIs are permenant identifiers assigned to digital objects such as journal papers or datasets. The DOI is the permanent identifier that should be used for citations and sharing.
Different versions of a package are linked together by what we call the “version chain” or “obsolescence chain”. Making an update to a data package, such as replacing a data file or editing the metadata, will result in a new identifier for the new version of the updated object. When making changes to a package, always use datapack::uploadDataPackage() for updating the entire package on the latest versions of all objects to ensure that the version chain is maintained. You can walk through the version chain of a data package on the ADC by clicking through the “Version History” arrows near the top left of the dataset’s landing page.
2.4 Upload a package
We will be using R to connect to the NSF Arctic Data Center (ADC) data repository to push and pull edits in actual datasets. To identify yourself as an admin you will need to pass a ‘token’ into R. Do this by signing in to the ADC with your ORCiD and password, hovering over your name in the top right corner and clicking on “My profile”, navigating to “Settings” and “Authentication Token”, copying the “Token for DataONE R”, and finally pasting and running it in your R console. The console is the bottom left window in RStudio.
This token is your identity on these sites, please treat it as you would a password (i.e. don’t paste into scripts that will be shared). The easiest way to do this is to always run the token in the console. There’s no need to keep it in your script since it’s temporary anyway.
You will need to retrieve a new one after it either expires or you quit your R session. They expire after about 24 hours.
Setting the token does not produce any output in the console. If the token is not set or is set incorrectly, you will know when an error is produced after trying to load a private dataset.
Sometimes you’ll see a placeholder in scripts to remind users to get their token, such as:
Since we will be working on the test site and not the production site, please remember to get your token from test.arcticdata.io
Next, please be sure these packages are loaded for the training (these should already be installed if you are working on the server):
library(devtools)
library(dataone)
library(datapack)
library(EML)
library(remotes)
library(XML)
library(uuid)
If any package could not be loaded, use the following command (replacing “package_name” with the actual package name) to install the package, then load them.
Now you’ll install the arcticdatautils and datamgmt packages with the code below. If prompted to update packages during the installation process, skip the updates. Now, run the following code to install and load the libraries.
remotes::install_github("nceas/arcticdatautils")
library(arcticdatautils)
remotes::install_github("nceas/datamgmt")
library(datamgmt)
When you are usually working with data packages you will only need the following: library(dataone) library(datapack) library(EML) library(arcticdatautils)
For this training, we will be working exclusively on the test site, or “node.” In many of the functions you will use, this will be the first argument. It is often referred to in documentation as mn, short for member node.
Different repositories use different member nodes. More information on the other nodes can be found in the reference section under Set DataONE nodes Set DataONE nodes
For example, if we are using the test site, set the node to the test Arctic node:
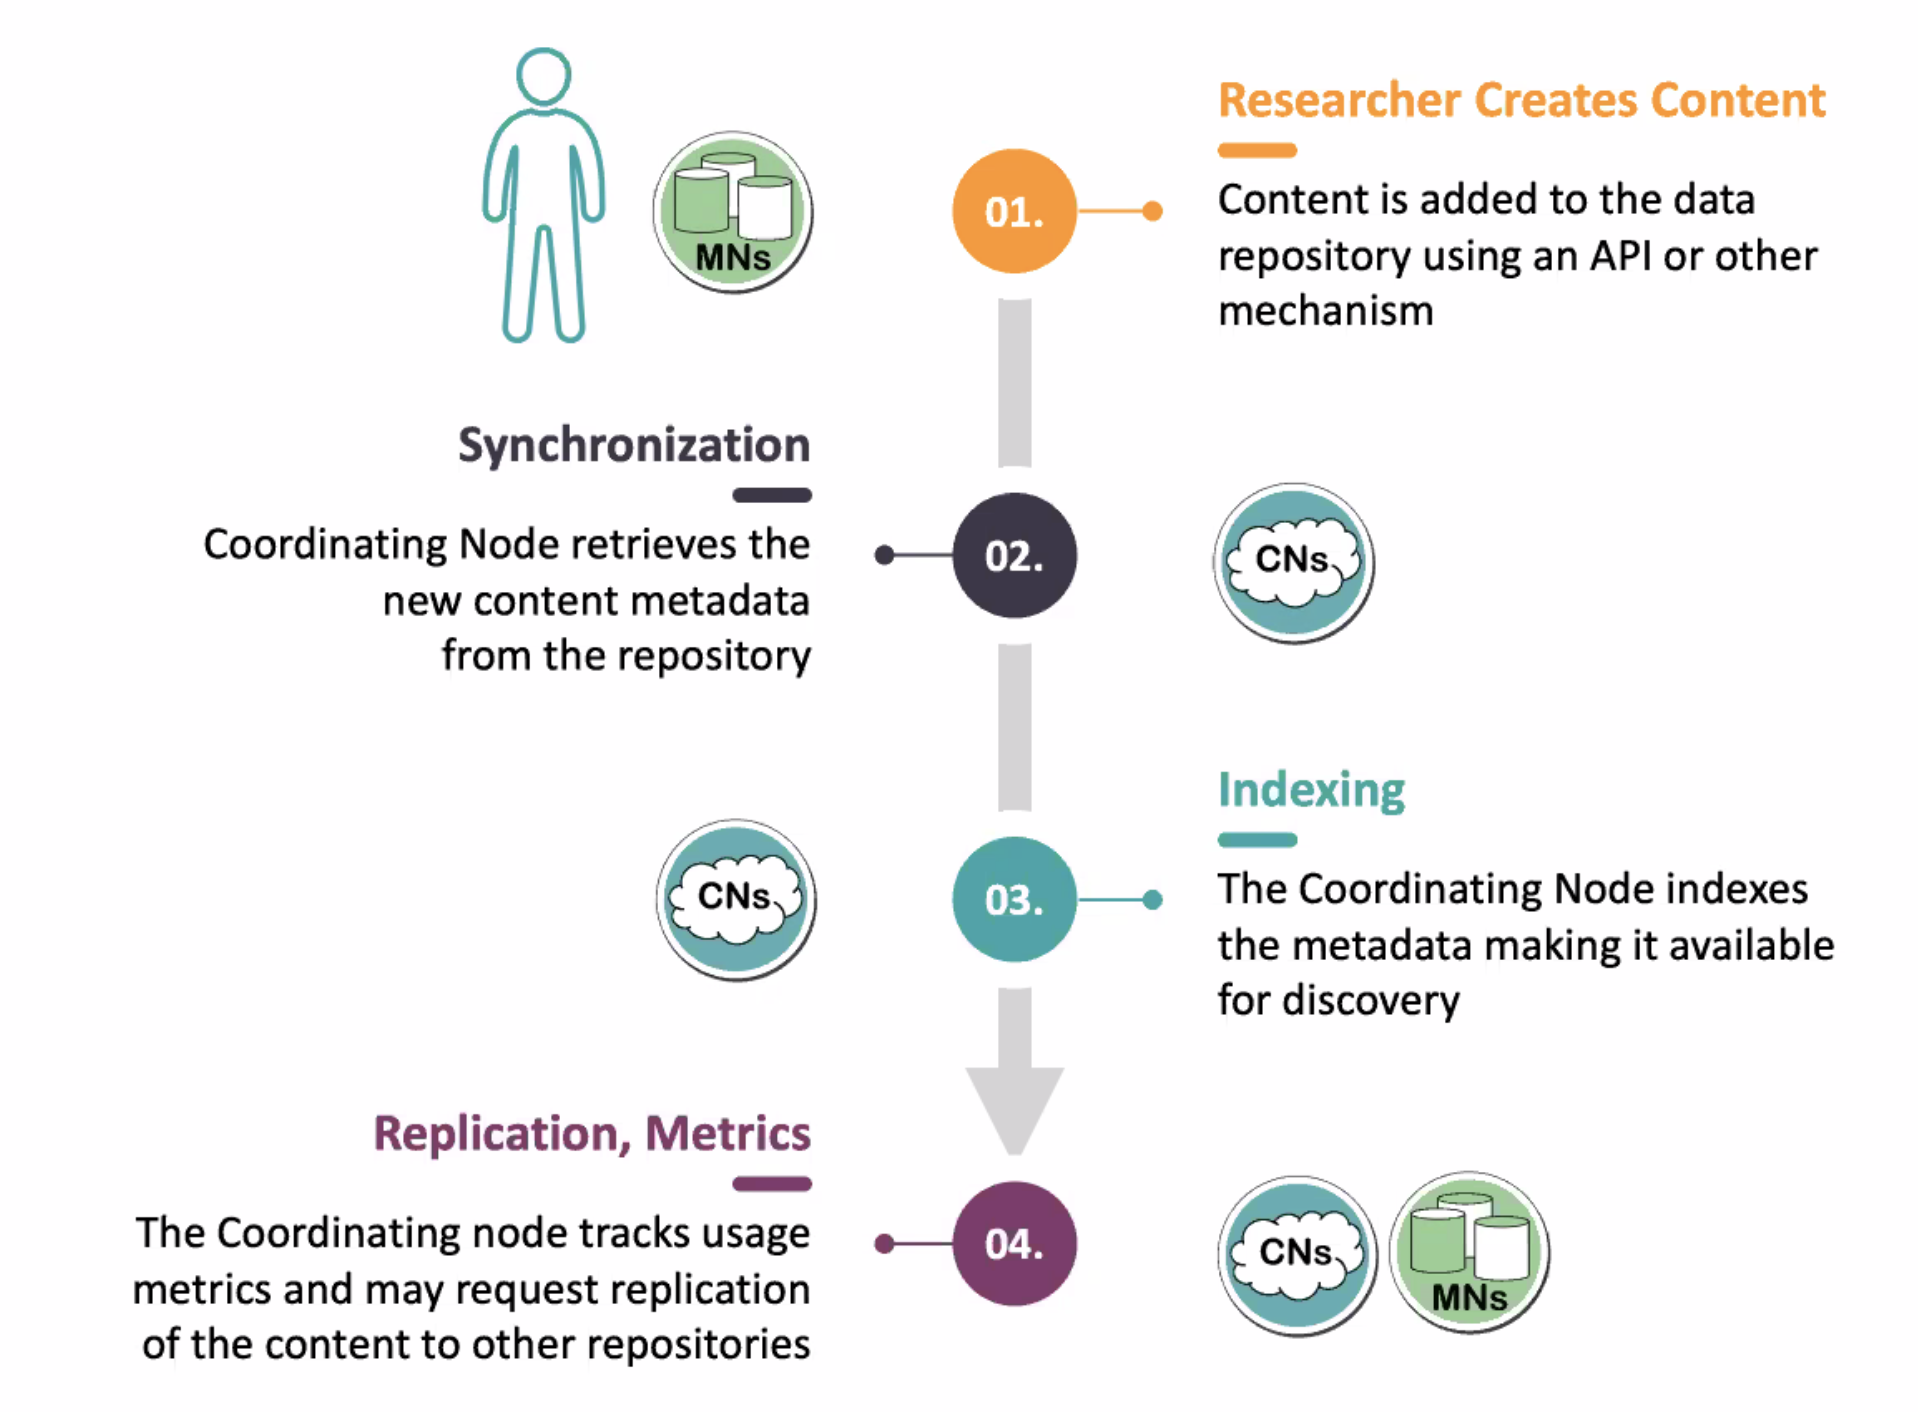
Once it is all set up, you’ll be able to publish a data object.
If you are curious how everything magically works, here is a handy diagram:
2.5 datapack Background
adapted from the dataone and datapack vignettes
datapack is written differently than most R packages you may have encountered in the past. This is because it uses the S4 system instead.
Data packages
Data packages are a class that has slots for relations (provenance), objects(the metadata and data file(s)) and systemMetadata.
2.5.2 Data Objects
You can see what slots are in an S4 object after typing the subsetting operator @, or pressing TAB with the cursor after an existing @. Try viewing the slots of the data package by pressing TAB after writing the following:
Check out the objects slot
The objects slot contains a list of object PIDs that are accessed using the $ subsetting operator. Both are found within the structure of data packages in R.
Get the number of data and metadata files associated with this data package with datapack’s getSize function.
Get the file names and corresponding PIDs using datapack’s getValue function. You can also get other sysmeta slots such as formatId and size by changing the name argument.
Get identifiers
You can search by any of the sysmeta slots such as fileName and formatId and get the corresponding identifier(s):
metadataId <- selectMember(dp, name="sysmeta@ADD THE NAME OF THE SLOT", value="PATTERN TO SEARCH BY")Example:
selectMember(dp, name="sysmeta@formatId", value="image/tiff")
selectMember(dp, name="sysmeta@fileName", value="filename.csv")
These will give you the PIDs of the files that are of the formatId “image/tiff” and the file name “filename.csv”, respectively.
2.6 Exercise 2a
Select a dataset from the catalog on the Arctic Data Center. Observe the number of data files in the dataset. Try to find identifiers for the metadata file and resource map on the landing page for the dataset based on the screenshot shown above.
2.7 Create a new data package
adapted from the dataone and datapack vingettes
Create a new data package
- a data package is a class that has slots for relations (provenance), objects(the metadata and data file(s)) and systemMetadata.
2.7.1 Upload new data files
2.7.1.1 Create and add a metadata file to the data package
In this example we will use this previously written EML metadata. Here, we are getting the file path from the dataone package and saving that as the object emlFile.
This is a bit of an unusual way to reference a local file path, but all this does is it looks within the R package dataone and it grabs the path to a metadata document stored within that package. If you print the value of emlFile you’ll see it is just a file path, but it points to a special place on the server where that package is installed. Usually you will just reference EML paths that are stored within your user file system.
Create a new DataObject for the metadata and add it to the package.
metadataObj <- new("DataObject", format="https://eml.ecoinformatics.org/eml-2.2.0", filename=emlFile)
dp <- addMember(dp, metadataObj)
Here, we have to specify the format of the metadata file. In this case, we are using EML version 2.2.0, so we specify that as the format. Different format IDs can be browsed through this DataONE reference list. The addMember() function adds the metadata object to the data package and also creates a unique identifier for it.
Check the dp object to see if the metadata object was added correctly.
2.7.1.2 Add some additional data files
sourceData <- system.file("extdata/OwlNightj.csv", package="dataone")
sourceObj <- new("DataObject", format="text/csv", filename=sourceData)
dp <- addMember(dp, sourceObj, metadataObj) # The third argument of addMember() associates the new DataObject to the metadata that was just added.
If you want to change the formatId please use
updateSystemMetadata (more on this later in the book)
2.8 Exercise 2b
This exercise will take you through how to do the submission process through R instead of the webform (exercise 1).
2.8.1 Part 1 - Gather your data files
For our convenience, we will be grabbing the metadata and data files from the file we published earlier:
- Locate the data package you published in Exercise 1 by navigating to the “My Profile > My Data” section on test.arcticdata.io.
- Download the metadata and data files and transfer them to the Datateam server. To do this, you can click the “Upload” button in your file explorer in RStudio.
2.8.2 Part 2 - Working in R
Now we want to publish the metadata and data files we downloaded again to test.arcticdata.io
- Obtain a token and please note that for this exercise please make sure you grab the token from the arcticdata test site
- Publish your metadata and data file to the test site.
#set the node
d1c_test <- dataone::D1Client("STAGING", "urn:node:mnTestARCTIC")

dp <- new("DataPackage")

#add your metadata
metadataObj <- new(...)
dp <- addMember(...)

#add your data files
sourceObj <- new(...)
dp <- addMember(...)

#upload your package
myAccessRules <- data.frame(...)
packageId <- uploadDataPackage(...)- The
packageIdvariable you get back is the identifier for the resource map. You can find the metadata PID and data PIDs by looking at thedpobject in your environment pane. The metadata PID will be listed under “metadata” and the data PIDs will be listed under “data”. - View your new data set by appending the metadata PID to the end of the URL test.arcticdata.io/view/…
- If you are successful it should look the same as the dataset you created in exercise 1
- Send a message to
#datateamwith the exercise number and a link to your new package.